Tuesday, June 12, 2012

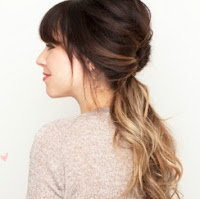
How To: Little Maiden Braid/ Hair Curling Tips

I know I've already posted a very very similar post - The Maiden Twists. But, why posting the same hair tutorial again? Well, because the girl who done this tutorial, also mentioned some very useful iron curling tips. I've already posted a quick basic hairstyle tutorial ( it actually shows you how to properly use a hair curling iron ). I must confess that I got pretty obsessed with the beauty of the blog where I found this - Sea Of Shoes. Jane ( the blogger ) is so original and beautiful! Just amazing!

After freshly washed hair, start by reading first the basic hairstyle post, to learn the proper way to use an hair curling iron. If you hair doesn't curl well, then put a palmful of hair mousse in it when it's halfway dry.  Comb out your hair and spray out  CHI Iron Guard Protection Spray  to prepare yourself. Warp your hair on the top of your head and clip it while you are curling the bottom strands first. Jane is using  a Bed Head 1 inch styling iron. When you curl, take 2 sections and alternate the direction in which you curl them. Do one section wrapping it away from the face, and the next one towards the face. Feel free not to use the curling clamp, you should let the hair slide off the iron and cool completely in your hand before you let it fall!  


After you're done the bottom section, finish it by misting with Bumble and bumble Spray de Mode  m and comb through the curl with your fingers. Them move to the top section. Curl the hair away from the face to get the flowy look.


Now that you've done running your fingers through your hair, start braiding a little loose braid just below your ear. So it would be easy to warp it around the head. After that just pin it in place. Hopefully you'll find the hair curling tips useful! Bye!  


Sunday, June 10, 2012

DIY: Beach Hair Spray

For me, the best go-to summer hairstyle ( without any effort ) is definitely the beautiful messy beach hair. As you know, messy hairstyles are IN this season. This tutorial is going to be very useful, until you get your natural beach waves. The hairspray is all natural, it contains sea salt and almost everything that you can find in your kitchen. There's no hair damaging or something like that, it'll be like you just spend a day at the beach.

{Here's the DIY beach hairspray tutorial} 
First, here are the ingredients. Everything you can find on Soap.com. All the credit you should give to Asuyeta Blog, I've found the tutorial there!
♥ Coconut oil
♥ Sea salt 
♥ Vodka  
♥Hair gel
♥ Spray bottle
♥Measuring cups

Make sure that the water is warm-hot so the coconut oil melts.

 Coconut oil smells so delightful, and it's very helpful. If your hair is dry just use 2-3 tbsp of coconut oil!

You can also use rubbing alcohol. It lets the spray last longer and helps to break down your hairs oil build-up.

 If your hair is more oily, use more sea salt. But, ONLY sea salt.

 A few spritzes of hair gel gives your hair a better hold and texture. 


NOW: Spray all over damp hair and scrunch with your fingers. Blow dry or let it air dry. Finger comb through your hair and you look like you just came from a beautiful and fun day at the beach! You'll look so beautiful! 

Friday, June 8, 2012

Make Up Tips: Red Lips

At this year's New York fashion week, red lips were everywhere! That was just the beginning of the trend. Now, women are wearing it not only for special events, but every part of the day. But, you'll need to watch out, because you can make an easy mistake combining it with what you are wearing. Well, that is not the theme of this post. I'm going to show you the easiest way to get  perfectly lined red lips. And in the same time using the maximum or their red color.

First, using a toothbrush or disposable mascara wand with a lip balm, remove any dead skin from your lips by gently scrubbing them in circular motions. Then outline the perimeter with a nude liner to prevent fathering. Apply red lipstick directly from the tube, and then using an eyeshadow blending brush & translucent loose powder. Powder your lips to really get the color. At the end apply a second coat with a lip brush to smooth edges and get perfect lines. 


Wednesday, June 6, 2012

MTV 2012 Movie Awards - The Best Dressed

Hey everyone! I'm sure that the most of you followed this year's MTV Movie Awards! A night to remember! The show was absolutely amazing. Funny host Russel Brand entertained the audience, and the big ones - Twilight & Hunger Games picked up the grand awards. And of course, there was the red carpet. A galaxy of stars were shining on it and showing their fashion sense. Everyone were dashing, but who was the fairest of them all?


The beautiful Emma Stone just lightened up the stage when she came up to get her award. She just looked stunning with black and ivory Martin Grant dress with nude heels.


All I can say it's WOW! Kristen Stewart looked dazzling and rocks the metallic multicolored look. The designer of the dress is Guishem and she made a excellent combination with black Louboutin shoes.


Then there is Kristen's co-star at the new movie hit - The Snow White & The Huntsman. Charzline was stunning in this red Lanvin dress with silver shoes. 


And of course there is Emma Watson, the star of the Harry Potter saga. She went bold in this fierce edgy Brood dress. Just lovely!


Mila Kunis in a dress by Fendi and Jimmy Choo shoes! 


I also liked what Victoria Justice wore. It's a beautiful dress by Erin Fetherston with amazing Swarovski jewels and Michael Kors heels.
Who do you think was the fairest of them all? 


Tuesday, June 5, 2012

How To: Little Hair Bow

Feeling knotty? No problem. This is maybe the easiest hair tutorial that I've posted, ever! This hair tutorial is on my new list of kick off hairstyles to begin your week with. Along with:

The Maiden Twists hairstyle

The Basic hairstyle 

The Twisted Side Ponytail 

I will try this tutorial tomorrow, after I come back from my little trip here, to the White palace - the place where all our kings lived and plus it's still working (when I say here, I mean in my country). See it here! I'm sorry for not writing about the main theme, I'm so excited! But basically this hairstyle is so easy and you have a little explanation on each picture. Bye!

Monday, June 4, 2012

How To: Twisted Side Ponytail

First the explanation for the previous "photo" post. It's for your easier navigation through the blog. To view the post you want, just click on the picture of the hairstyle. The whole post is linked to Hair Tutorials. Not all hair tutorials are linked, there are just too much of them, and because it's still work in progress, I'll be adding them. Pretty cool ha? Hopefully you'll like the idea, it's very useful ( and it's going to be even better as the time goes by, and finally all hair tutorials are going to be at one place )!

Okay, let's begin! Style it by pinning a small section of hair at the back of your neck. Continue by pulling small sections of hair across and pinning along the base of the neck. Continue like that until you get a side ponytail, and leave out a section at the front. Tie off the ponytail and warp the remaining hair around the pony to cover the hairband. The girl who did this tutorial is really amazing - Katie from Skunkboy.


HAIR TUTORIALS


Design by Wakdol | Download this template