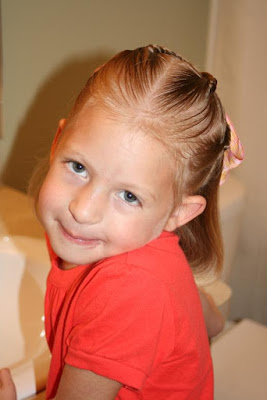
I started this with dry hair. I don't see why you couldn't do it with wet hair.
Section off a square on the top of the head. I used her natural part as my guide. I then pulled out the spray bottle and sprayed the section till it was fully saturated. I put gel in it as well.
Then I twisted. My twist went towards the back of her head. Twist it down until you have three or so inches on the bottom. Make sure you twist it TIGHT!
Thursday, July 31, 2008
Top Twist
Posted by Unknown at 2:16 PM 0 comments
Labels: Twist
Wednesday, July 30, 2008
Butterfly Hair
A new family is moving across the street from us. They came to our ward (congregation) on Sunday and her daughters had their hair done like this. They called it butterfly hair, because it looks like butterfly wings.
Posted by Unknown at 10:15 AM 0 comments
Labels: Braids
Sunday, July 20, 2008
Soft and a little more grownup.
My girl is growing up. She is throwing her locks in with the likes of HSM and Hannah Montana. She wants the soft curls and the trends. Which is okay with me, so long as she lets me braid it once in a while.
We started out with dry hair. I curled the ends and teased all around her crown.
Then we pulled back the hair where her bangs (if she had them) would have been. I usually use four bobby pins. Make an X and then another one over the top of that. Pull out the front just a bit to make the pieces a bit more uniform.
Posted by Unknown at 8:00 AM 0 comments
Labels: Ponytails
Friday, July 18, 2008
I'm back...and how about some criss cross braids.
Whoa, that was longer than I thought. I beg for forgiveness. We have had swimming lessons each day this week at noon and it just didn't make sense to do my girls hair twice a day, so instead they have resembled orphans.
HOWEVER,
Today there was no swimming lessons. WOOT!
This was going to start out as two braids pulled together. I have been doing just my regular standbys lately, but we decided to take it up a notch. It turned out pretty cute. You could do this with six braids as well. SO fun!
Part the hair into four sections.
Braid down as far as you can. I did an upside down braid this time.
Secure each section with an elastic.
Then, if you numbered the braids 1...2...3...4, you take braids 1 & 3 together and secure them with an elastic.
Then comb the hair under smooth and spritz with some hairspray.
Then secure braids 2 & 4.
Tie a ribbon around each braid.
Curl the ends under.
Posted by Unknown at 12:15 PM 0 comments
Labels: Braids


